How to import Magento products: a step-by-step guide
TL;DR:
- The fastest way to import Magento products is via the admin CSV import feature, using UTF-8 encoding and a proper template. Proper preparation includes exporting sample data, validating attributes, and carefully managing images and configurable products. Running imports on staging, backing up first, and verifying data ensures minimal errors and catalog consistency.
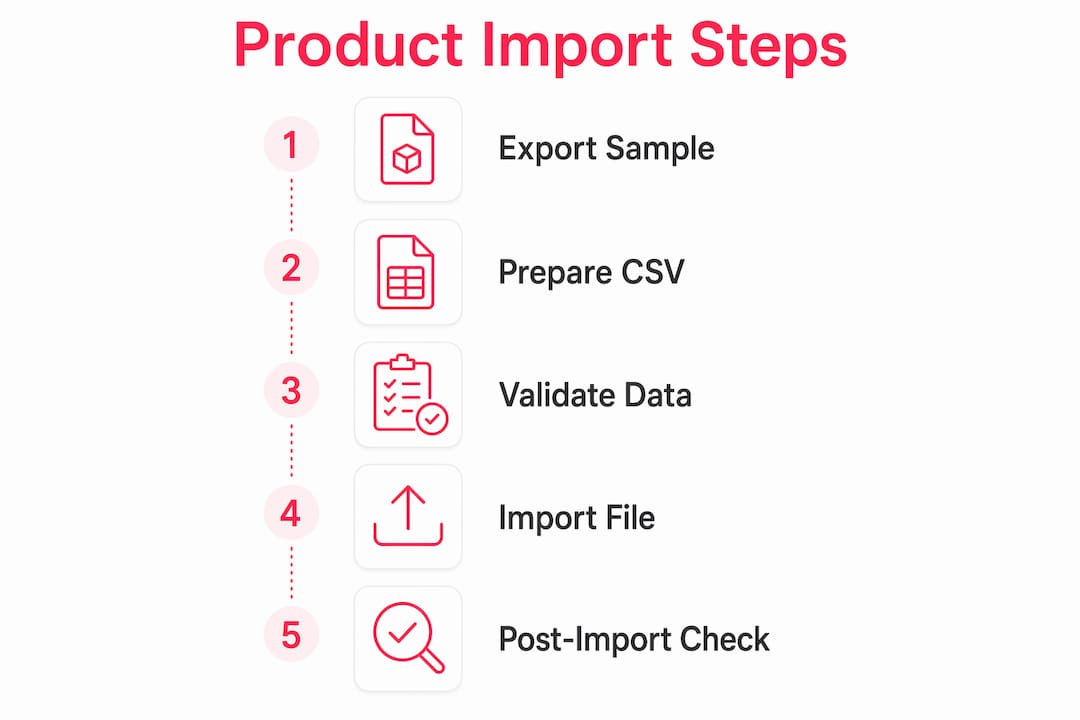
The fastest reliable way to import Magento products is via Admin > System > Data Transfer > Import, using a UTF-8 encoded CSV with Add/Update behaviour, images placed in pub/media/import or referenced by remote URL, and the Check Data button run before every import. That single workflow covers the vast majority of catalogue updates, new product loads, and migrations.
Before you go any further, here is the short checklist that gets you to a safe first import:
- Export a small set of existing products from your store to use as your CSV template.
- Confirm your CSV is saved as UTF-8 (not UTF-8 BOM, not Windows-1252).
- Fill the five mandatory columns:
sku,attribute_set_code,product_type,name,price. - Upload the file in Admin > System > Data Transfer > Import, select Entity Type = Products, and click Check Data.
- Fix every validation error before clicking Import.
Two additional steps before any large import: take a full database backup, and run the import on a staging environment first. For anything over a few hundred SKUs, put the site into maintenance mode to prevent partial catalogue states reaching customers.
Table of Contents
- How do you prepare a CSV to import Magento products correctly?
- How do you run a product import through the Magento Admin?
- How do you import product images into Magento 2?
- How do you handle configurable, grouped and bundle products in CSV?
- How does Multi-Source Inventory stock import work in Magento 2?
- What are the most common Magento import validation errors and how do you fix them?
- What should your preflight checklist look like before a large import?
- Key takeaways
- What we have seen: an agency note on common pitfalls
- Bigeyedeers’ Magento import and migration support
- Authoritative references and further reading
How do you prepare a CSV to import Magento products correctly?
Getting the CSV right before you touch the Admin is where most imports succeed or fail. Adobe Commerce documentation is clear: the file must be UTF-8 encoded and must include a specific set of mandatory columns. Miss one, and Check Data will reject the entire file.

Mandatory and commonly required columns
The five columns Magento will not accept a file without are:
| Column | Example value | Notes |
|---|---|---|
sku |
TSHIRT-RED-M |
Primary key; must be unique per product |
attribute_set_code |
Default |
Must match an attribute set that already exists in your store |
product_type |
simple |
Options: simple, configurable, grouped, bundle, virtual, downloadable |
name |
Red T-Shirt Medium |
Displayed product name |
price |
29.99 |
Base price; decimal point, no currency symbol |
Beyond those five, you will almost always need:
tax_class_name— e.g.Taxable Goodsstatus—1(enabled) or2(disabled)visibility—4(Catalogue, Search),3(Search),2(Catalogue),1(Not Visible Individually)weight— required for physical productsproduct_websites— the website code (e.g.base); leave this blank and the product will not appear on the storefrontcategories— full path using forward slashes, e.g.Default Category/Gear/Bags; separate multiple categories with a pipe|image,small_image,thumbnail,additional_images— filenames or remote URLs
UTF-8 encoding and Excel pitfalls
Excel is the single biggest source of encoding failures. When you save a CSV from Excel, it defaults to your system locale encoding, not UTF-8. Always use Save As > CSV UTF-8 (Comma delimited) in Excel 2016 or later, or use Google Sheets and export as CSV (which outputs UTF-8 by default). If you are inheriting a supplier file, open it in a text editor such as Notepad++ or VS Code and check the encoding shown in the status bar. The iconv command-line tool can convert a file cleanly: iconv -f ISO-8859-1 -t UTF-8 input.csv > output.csv.
Hidden characters from copy-pasting out of Word or PDF are another common culprit. A zero-width space or a non-breaking hyphen in a product name will pass visual inspection but fail validation. Running the file through a tool like Notepad++ with View > Show Symbol > Show All Characters active will expose them.
Use an exported sample as your canonical template
The most reliable approach, and the one Adobe Commerce recommends, is to export a small set of existing products first. Go to System > Data Transfer > Export, set Entity Type to Products, and download the CSV. That file gives you the exact headers your store expects, in the right order, with the right attribute codes. Many validation errors come from slight header differences or hidden Excel characters introduced when building a file from scratch.
Pro Tip: If your import includes attribute option values that do not yet exist in your store (for example, a new colour option called “Slate Grey”), create those attribute options in the Admin before importing. Magento will reject rows that reference option values it cannot find. You can also import attribute options separately using a custom script or a third-party import extension, but creating them manually first is the safest approach for small sets.
How do you run a product import through the Magento Admin?
Once your CSV is ready, the Admin import flow is straightforward, but each step matters. The import process requires you to select the correct entity type, choose the right import behaviour, validate the file, and only then execute.
Step-by-step Admin import instructions
- Log in to the Magento Admin and go to System > Data Transfer > Import.
- Under Import Settings, set Entity Type to
Products. - Under Import Behaviour, choose your behaviour (see below).
- Under File to Import, click Choose File and select your UTF-8 CSV.
- If your images are stored locally on the server, enter the directory path in Images File Directory (e.g.
pub/media/import). Leave it blank to use the default/var/import/images. - Click Check Data in the top-right corner.
- Review the validation output. If errors appear, fix them and re-upload before proceeding.
- Once validation passes with no errors, click Import.
- After the import completes, click Cache Management in the confirmation message and flush all invalid caches.
- Run a manual reindex: go to System > Index Management, select all indexers, and choose Reindex Data from the Actions dropdown.
Understanding import behaviour options
Choosing the wrong behaviour is one of the most damaging mistakes you can make. The three options work very differently:
- Add/Update — the safe default for almost every situation. Existing SKUs are updated field by field; new SKUs are created. Fields not present in your CSV are left untouched. Note that for multi-value fields like
categoriesandproduct_websites, Add/Update can only add values, not remove them. - Replace — exercise real caution here. Replace deletes the matched product record entirely and rebuilds it from the CSV row. All existing field values, including those not in your CSV, are cleared. Reviews, wish-list references, and order associations tied to the old entity ID are severed. Use Replace only when you need a full reset of a product set and have a complete backup.
- Delete — reads only the
skucolumn and removes matched products. Every other column is ignored. If a SKU in the CSV does not exist in the store, the import will error.
Post-import tasks
Do not skip these after every import:
- Flush the full page cache and block HTML cache from System > Cache Management.
- Reindex all affected indexers, particularly the catalogue product price, category product, and product EAV indexers.
- Spot-check product pages on the storefront, including salable quantity and category placement.
- If you use Klevu or a similar search tool, trigger a re-sync so newly imported products appear in search results promptly.
How do you import product images into Magento 2?
Images are the most common post-import complaint: the data looks fine in the Admin, but the storefront shows broken image icons. The root cause is almost always a mismatch between where the files physically sit on the server and what the CSV references.
Three approaches to image import
- Local server import — place image files in
pub/media/import(or/var/import/images) via SFTP before running the import. Reference only the filename in the CSV (e.g.red-tshirt.jpg). Commerce creates its own directory structure during import, so a simple filename is sufficient when the Images File Directory is configured correctly. This is the fastest method for large batches already on the server. - Remote URL import — enter a full URL (e.g.
https://cdn.example.com/images/red-tshirt.jpg) directly in the image column. Magento fetches and caches the file during import. Useful for migrations from another platform, but slower and dependent on the remote server being accessible during the import run. - Remote storage configuration — for Adobe Commerce Cloud or stores using AWS S3 or Azure Blob Storage as remote storage, images can be pulled from the configured remote storage bucket. This is an infrastructure-level setting rather than a per-import option.
Image column names and multiple images
The four image columns to use in your CSV are:
image— the main product image (also called base image)small_image— used in category listings and search resultsthumbnail— used in the cart and related product widgetsadditional_images— comma-separated list of extra images, e.g.red-tshirt-back.jpg,red-tshirt-detail.jpg
You can set small_image and thumbnail to the same filename as image if you only have one image per product.
Troubleshooting missing images
- Image filenames are case-sensitive on Linux servers.
Red-Tshirt.jpgandred-tshirt.jpgare different files. Match the case exactly. - Check SFTP upload permissions. The
pub/media/importdirectory needs to be readable by the web server user (typicallywww-dataornginx). - If images are missing after import, check
var/log/system.logfor image-related errors. Magento logs failed image fetches there. - Verify the Images File Directory field matches the actual path where you uploaded the files. A trailing slash or a typo here will silently fail every image.
How do you handle configurable, grouped and bundle products in CSV?
Configurable products are where CSV imports get genuinely complex. The parent-child relationship between a configurable product and its simple variants must be expressed correctly, or the variants simply will not attach.
Configurable products: parent and child rows
Each configurable product requires at least two types of rows in the CSV: one row for the parent configurable product, and one row per simple variant. The key column linking them is configurable_variations.
For the parent row:
product_type=configurableconfigurable_variationslists each variant using its SKU and the attribute values that define it, e.g.sku=TSHIRT-RED-M,color=Red,size=M|sku=TSHIRT-RED-L,color=Red,size=Lconfigurable_variation_labelsdefines the label shown to customers, e.g.color=Colour,size=Size
For each child (simple) row:
product_type=simplevisibility=1(Not Visible Individually) — this hides the variant from category pages and search, so customers only see the parent- The variant-defining attribute columns (e.g.
color,size) must contain the exact option values that exist in your attribute set
Import order matters. Import the simple child products first, then the configurable parent. If the parent row is processed before its variants exist in the catalogue, the configurable_variations associations will not build correctly. The import may not error, but the storefront will show no selectable options.
For a practical walkthrough of the manual setup that underpins this structure, the guide on adding configurable products in Magento is worth reading alongside this CSV approach.

Grouped and bundle products
Grouped products reference their component simple products via the associated_skus column. List the component SKUs separated by commas. Each component must already exist in the catalogue before the grouped product is imported.
Bundle products are the most complex type to import via CSV. Each bundle option and its selections require their own rows, with columns like bundle_price_type, bundle_sku_type, bundle_price_view, and bundle_shipment_type on the parent row, plus bundle_values to define the options. For anything beyond a straightforward bundle, exporting an existing bundle product first and using that as your template is strongly advised.
Pro Tip: The most common configurable import failure is mismatched attribute option values. If your CSV says color=Slate Grey but the attribute option in Magento is stored as Slate Gray (US spelling), the association will silently fail. Export an existing configurable product first, copy the exact option value strings from that export, and paste them into your new rows. Do not retype them.
For stores with large numbers of custom attributes, the guide on importing attributes into Magento 2 covers attribute set preparation in detail.
How does Multi-Source Inventory stock import work in Magento 2?
Multi-Source Inventory (MSI) stock data is imported separately from product data, using a different entity type. Getting this wrong means your products import successfully but show as out of stock, or show incorrect salable quantities.
MSI source items CSV structure
To update stock at source level, go to System > Data Transfer > Import and set Entity Type to Stock Sources. The required CSV columns are:
source_code— the code of the inventory source (e.g.default,warehouse-cardiff)sku— must match an existing product SKUquantity— numeric stock quantitystatus—1for In Stock,0for Out of Stock
A minimal row looks like: default,TSHIRT-RED-M,50,1
When to import stock separately
For a fresh catalogue load, import product data first, then run a separate import for source items. This sequence avoids a race condition where the stock import references SKUs that do not yet exist. Run Check Data on the source items CSV just as you would for product data.
For very large catalogues or frequent stock updates (e.g. daily ERP sync), the Admin CSV import will hit PHP server limits. The Adobe Commerce REST API provides POST /V1/import/csv and POST /V1/import/json endpoints that mirror Admin functionality and support gzip compression for large payloads. For high-frequency stock updates, the bulk async REST API is more appropriate than repeated CSV uploads.
Practical MSI constraints
- Split large source item CSVs by source code to keep file sizes manageable and isolate errors.
- Salable quantity (what customers see) is calculated from source quantities minus reservations. After a stock import, reindex the Inventory indexer to update salable quantities.
- If you assign a product to a new source for the first time via CSV, the source must already be configured in Stores > Inventory > Sources.
What are the most common Magento import validation errors and how do you fix them?
Check Data is your best friend, but its error messages can be cryptic. Here is a practical reference for the errors you are most likely to encounter.
| Error message | Likely cause | Quick fix |
|---|---|---|
Product with specified SKU not found |
Using Replace or Delete on a SKU that does not exist | Switch to Add/Update, or verify the SKU exists before deleting |
URL key for specified store already exists |
Two products share the same generated or explicit URL key | Add a unique url_key column to your CSV and give each product a distinct value |
Invalid value for attribute |
An attribute option value in the CSV does not match any stored option | Export an existing product to find the exact stored option string; create missing options first |
Encoding error / invalid characters |
CSV is not UTF-8, or contains hidden characters | Re-save as UTF-8 in Notepad++ or use iconv; check for zero-width spaces |
Category not found / not created |
Category path in CSV does not match the store’s category tree | Use the exact full path from the Admin category tree, including correct capitalisation |
Images not found |
Image files not uploaded to the correct server directory | Upload files to pub/media/import; check case-sensitive filenames and SFTP permissions |
Duplicate SKU in file |
The same SKU appears more than once in the CSV | Deduplicate rows; keep only the most complete row per SKU |
Debugging workflow
Start with a small test file. If you have a 5,000-row CSV and Check Data returns 47 errors, isolate the problem by extracting 10–20 rows that include the failing products and running Check Data on that subset. This narrows the cause quickly.
For encoding issues, open the file in a proper text editor rather than Excel. VS Code shows the encoding in the bottom-right corner and lets you re-save in UTF-8 with one click. For persistent hidden characters, the cat -v command in a Linux terminal will expose non-printable characters as visible symbols.
When an import passes Check Data but fails during execution with a database error (such as an integrity constraint violation on a custom option table), the issue is usually with product custom options or duplicate database IDs. Prepare a short test file of 5–10 products with custom options and import that first to isolate the offending row before attempting the full file.
For URL key conflicts, the safest fix is to add an explicit url_key column to your CSV and populate it with a unique slug for every product. If you leave url_key blank, Magento generates it from the product name, and near-identical names will collide. Keeping an eye on SEO-friendly URL key practices during import pays dividends in organic search performance later.
What should your preflight checklist look like before a large import?
A failed import on a live store is not just a technical problem. It can leave your catalogue in a partial state, break category pages, and affect customer-facing stock levels. A belt-and-braces preflight process prevents most of those outcomes.
Preflight checklist
- Back up the database before every import, without exception. A full database dump takes minutes and gives you a clean rollback point.
- Export a sample CSV from the live store and use it as your template. This is the single most effective way to avoid header mismatches.
- Test on staging first. Run the full import on a staging environment that mirrors production. Verify storefront output, category placement, and salable quantities before touching live.
- Start with a small batch. Import 10–20 rows first, even if your final file has thousands. Confirm the output is correct, then scale up.
- Check PHP server limits. Large CSV files can hit
upload_max_filesize,post_max_size, andmax_execution_timelimits. Increase these inphp.inior split the CSV into smaller batches. - Confirm role permissions. The Admin user running the import needs access to System > Data Transfer. Restricted roles may not have this by default.
- Plan your reindex and cache flush. Know which indexers to run after import and schedule them for off-peak hours on large catalogues.
Staging test plan
On staging, run the import and then check:
- Product pages render correctly on the storefront.
- Category pages show the imported products in the right positions.
- Salable quantity displays correctly (reindex Inventory first).
- Configurable product variant selectors work and all options are selectable.
- Images load without broken icons.
- URL keys are unique and resolve to the correct product pages.
For post-import performance checks, the guide on optimising your Magento 2 store post-launch covers cache, indexing, and storefront verification in more detail.
When to hand off to an agency
Some import projects are straightforward enough to run in-house. Others are not. Consider bringing in specialist support when:
- Your catalogue has complex attribute sets with hundreds of custom attributes.
- You are migrating from another platform (Shopify, WooCommerce, a bespoke system) and the data needs transformation before it maps to Magento’s structure.
- ERP integration is involved and stock, pricing, or product data needs to sync on a schedule.
- You are running a multi-store or multi-source MSI setup where a mistake in one store affects others.
- Time pressure means there is no room for trial-and-error debugging.
Pro Tip: Once you move to automated or API-driven imports, restrict manual catalogue edits in the Admin. If an automated process runs after a manual edit, it will overwrite the change and create catalogue inconsistency. Agree a clear rule with your team: either the automation owns the data, or the Admin does. Not both.
Key takeaways
A successful Magento 2 product import depends on a UTF-8 CSV with the correct mandatory columns, a validated Check Data pass, and a staged test run before touching the live catalogue.
| Point | Details |
|---|---|
| Export first, import second | Export a sample CSV from your store and use it as the template to avoid header mismatches and encoding errors. |
| UTF-8 and mandatory columns | Every CSV must be UTF-8 encoded and include sku, attribute_set_code, product_type, name, and price. |
| Use Add/Update by default | Replace deletes and rebuilds product records, severing reviews and order associations; Add/Update is safe for almost every update. |
| Images, configurables, and MSI | These three areas cause the most post-import failures; upload images before importing, import child rows before parents, and run a separate stock import for MSI. |
| Bigeyedeers for complex imports | For large SKU counts, ERP integrations, or multi-store MSI environments, Bigeyedeers provides specialist Magento import and migration support. |
What we have seen: an agency note on common pitfalls
We have handled product imports across a wide range of Magento builds at Bigeyedeers, from straightforward simple-product loads of a few hundred SKUs to full platform migrations involving tens of thousands of configurable products with complex attribute sets, tiered pricing, and live ERP connections. The technical steps in this guide are sound, but the failures we see most often are not technical at all.
The most common issue is data quality; using a tool like MerchUp can help generate and enhance product descriptions at scale to improve content quality. A supplier-provided spreadsheet that looks clean in Excel frequently contains encoding problems, inconsistent attribute option values, or category paths that do not match the store’s actual tree. The second most common issue is sequence: importing configurable parents before their child variants, or importing stock before the products exist. Both produce errors that are confusing to diagnose if you do not know what to look for.
Where we add the most value is in the intersection of data transformation and Magento’s import rules, particularly for B2B catalogues with account-specific pricing, multi-store assignments, and MSI source configurations. If you are dealing with an ERP integration where product and stock data needs to flow automatically, the import process itself is only part of the picture. The data mapping, scheduling, and error-handling logic around it is where things get complicated, and where a poorly designed process will cause ongoing catalogue inconsistency.
Bigeyedeers’ Magento import and migration support
If your import project involves more than a straightforward CSV upload, Bigeyedeers can take it off your plate. We work with UK retailers and B2B brands on Magento catalogue builds and migrations, handling everything from data transformation and attribute mapping to ERP integration and multi-source MSI configuration. Whether you are loading a new catalogue from scratch, migrating from another platform, or setting up a scheduled import pipeline, we scope the work clearly and deliver it without the back-and-forth that drags these projects out.

We are particularly well-suited to complex scenarios: large SKU counts, configurable products with deep attribute sets, multi-store setups, and B2B catalogues where pricing and visibility rules vary by account. If you are not sure whether your import needs agency support or just a bit of guidance, get in touch with the team and we will give you a straight answer.
Authoritative references and further reading
The Admin CSV import workflow and the REST API are documented separately. For day-to-day CSV imports, the Admin documentation is sufficient. For automated or high-volume imports, the API reference is the right starting point.
- Import data | Adobe Commerce Experience League — the primary reference for Admin import steps, required columns, import behaviours, and Check Data validation.
- Product image import | Adobe Commerce Experience League — covers image column names, server directory placement, and multiple image handling.
- Import configurable products | Adobe Commerce Experience League — step-by-step example of exporting, editing, and re-importing a configurable product with new variants.
- Data transfer | Adobe Commerce Experience League — overview of all import and export entity types, including Advanced Pricing and Stock Sources.
- Import API | Adobe Commerce developer documentation — REST endpoints for CSV and JSON import, including gzip support for large payloads and async bulk operations.
- Getting started with product import and export | Magento Open Source merchant documentation — practical tutorial covering the export-as-template workflow, MSI source items CSV structure, and PHP server limit guidance.
For version-specific compatibility notes and Magento Open Source download information, the Magento developer guide on the Bigeyedeers site is a useful reference alongside the official documentation.
Recommended



Adobe Commerce (Magento)
Formerly known as Magento, Adobe Commerce is built for complex catalogues, integrations, and long term growth. We design and develop stable, scalable stores that support demanding eCommerce requirements, including multi-store setups, complex pricing, and Hyva based performance improvements.

Bespoke Build
We design and build custom eCommerce platforms for businesses with complex workflows, integrations, or non standard requirements. Built from scratch around your business needs using Laravel and modern architectures.

Working with brands across the UK from our offices in Cardiff and Exeter, you deal directly with a senior team of designers and developers specialising in Shopify, Magento, WordPress and bespoke eCommerce platforms.
We focus on commercial outcomes. Better conversion rates, strong SEO foundations and eCommerce platforms that continue to improve long after launch.